For this tutorial, I will be using the following:
- cPanel web hosting;
- Shell access to your hosting account;
- Apache web server with FollowSymLinks enabled;
- The WP Super Cache plugin for WordPress.
So let’s get started.
Step 1: Creating a Subdomain for the CDN
Start by logging in your cPanel account and then click on the “Subdomains” icon.

Enter the subdomain you wish to use for the CDN. For this tutorial, I am using the “webhostingshed.com” domain so I will be using the “cdn.webhostingshed.com” subdomain for my CDN:
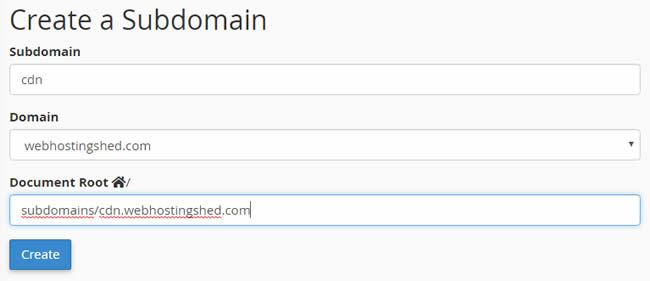
Important: Note that the document root for the subdomain is located outside of the public_html directory. It’s important to do so in order to avoid that the “.htaccess” file located in “public_html” have any impact on your subdomain. The “subdomains” directory needs to be created at the same level as “public_html”.
If you have SSL enabled on your website, then it is imperative that you enable SSL for your CDN subdomain also. Depending on how your server has been set up by your web hosting provider, a free SSL certificate might be generated and installed automatically (AutoSSL) when you’ve created the subdomain. To verify this, simply point your web browser to https://cdn.yourdomain.com and see if the padlock appears in the address bar:
![]()
Should you encounter any issue with your SSL certificate, you should contact your web hosting provider.
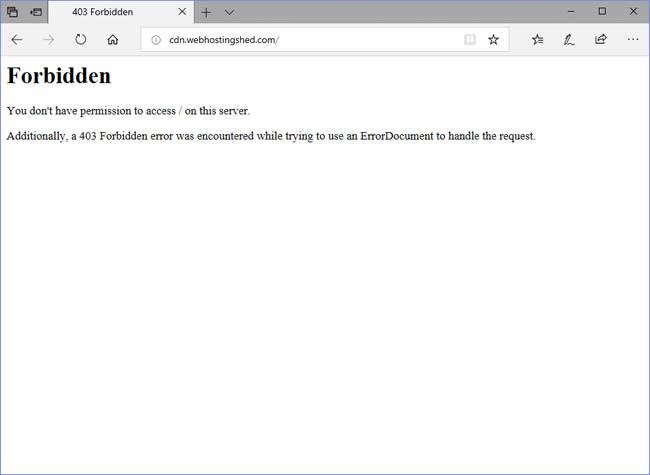
At this point, your CDN subdomain should be accessible however, it’s still empty. You can still try it out to make sure it resolves correctly even though it will return an error message:
Step 2: Creating Symbolic Links
In order to make the media files accessible through the CDN subdomain, you’ll need to create symbolic links. Also known as a soft link, a symbolic link is a file that points to another file much like a kind of shortcut. Since everything in Linux is a file, you can also create a symbolic link pointing to a directory.
To do this, head back to your cPanel control panel and click the “Terminal” icon from the “Advanced” panel:

Click on “I understand and want to proceed” on the next page to launch a secure shell session:
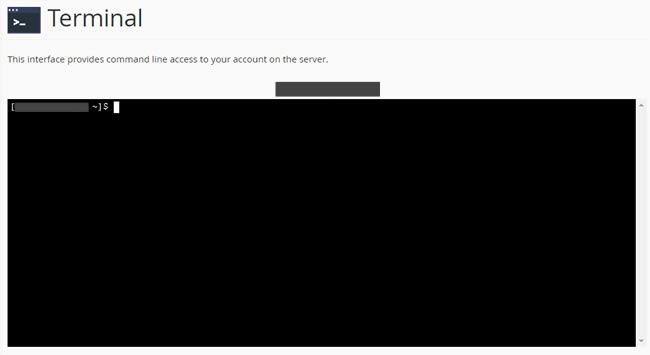
Now you’ll need to type the following commands to create the symbolic links. For this tutorial, I’m assuming that WordPress is installed at the root of your main domain (ie.: /public_html). Of course, you need to replace “cdn.webhostingshed.com” by your CDN subdomain name:
ln -s ~/public_html/wp-admin ~/subdomains/cdn.webhostingshed.com/wp-admin
ln -s ~/public_html/wp-content ~/subdomains/cdn.webhostingshed.com/wp-content
ln -s ~/public_html/wp-includes ~/subdomains/cdn.webhostingshed.com/wp-includes
If you have created other directories outside of the WordPress architecture, you should create additional symbolic links the same way.
Next, we’ll make sure that we can access the files through the subdomain. In this case, I’ll try to pull up the style.css file from the current WordPress theme:
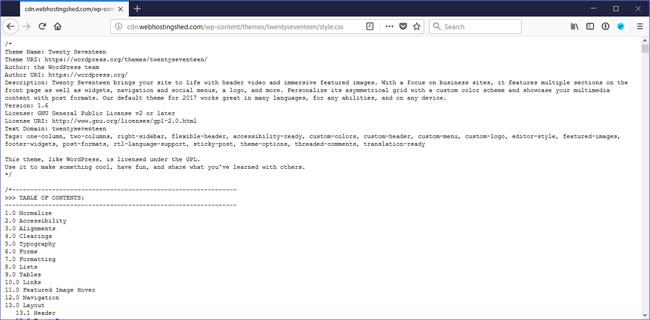
If all is working fine, move on to the next step.
Step 3: Preventing Search Engine From Indexing HTML Content
In order to avoid duplicate content issues, you must prevent search engines from indexing any HTML content. To do so, create a file named “robots.txt” and insert the following content:
User-agent: *
Disallow: /
Allow: *.css?*
Allow: *.js?*
Allow: *.jpg?*
Allow: *.gif?*
Allow: *.png?*
Allow: *.jpeg?*
Allow: *.css
Allow: *.js
Allow: *.jpg
Allow: *.gif
Allow: *.png
Allow: *.pdf
Allow: *.jpeg
Allow: *.woff2
Allow: *.woff
Allow: *.ttf
If you need to allow the indexation of additional file extensions, just add them there. Once you are done, upload the file into the subdomain root directory (ie.: ~/subdomains/cdn.webhostingshed.com/).
Step 4: Preventing Visitors From Browsing Your Subdomain Directory
To avoid visitors from browsing all the files available on your CDN subdomain, you need to disallow “indexes”. To do so, create a file named “.htaccess”, insert the following content and upload it to your server into the ~/subdomains/cdn.yourdomain.com/ directory:
Options All -Indexes
Step 5: Forcing HTTPS Access
Unless you have SSL enabled on your WordPress site, you can skip this step.
To make sure that the visitors will access the CDN content securely, you must redirect all the requests made through the port 80 to HTTPS on port 443. Append this code to the content of the “.htaccess” file:
RewriteEngine on
RewriteCond %{SERVER_PORT} ^80$
RewriteRule ^(.*)$ https://%{SERVER_NAME}%{REQUEST_URI} [L,R]
RewriteCond %{HTTP_HOST} !^cdn\.webhostingshed\.com [NC]
RewriteCond %{HTTP_HOST} !^$
RewriteRule ^/?(.*) https://cdn.webhostingshed.com/$1 [L,R,NE]
Now try to access your subdomain through http://[…] and see if your browser is automatically being redirected to https://[…].
Step 6: Enabling Expiration Headers
In order to optimize the browser caching of the files served through the CDN, you must append the following content to the “.htaccess” file:
<IfModule mod_headers.c>
   <FilesMatch "\.(css|js|jpg|jpeg|gif|png|pdf|woff2|woff|ttf)$">
   Header set Access-Control-Allow-Origin "*.webhostingshed.com"
   </FilesMatch>
   Header always set Strict-Transport-Security "max-age=31536000" env=HTTPS
   Header always append X-Frame-Options SAMEORIGIN
   <FilesMatch "\.(js|css|swf|ico|gif|jpg|jpeg|png|flv|pdf|woff|woff2|pdf)$">
   Header set Cache-Control "max-age=29030400"
   </FilesMatch>
</IfModule>

<IfModule mod_expires.c>
   ExpiresActive On
   ExpiresDefault "access plus 10800 seconds"
   ExpiresByType font/opentype A29030400
   ExpiresByType font/truetype A29030400
   ExpiresByType font/eot A29030400
   ExpiresByType image/gif A29030400
   ExpiresByType image/png A29030400
   ExpiresByType image/jpeg A29030400
   ExpiresByType image/x-icon A29030400
   ExpiresByType application/pdf A29030400
   ExpiresByType application/x-javascript A29030400
   ExpiresByType application/javascript A29030400
   ExpiresByType text/plain A86400
   ExpiresByType text/css A604800
   ExpiresByType application/xml A604800
</IfModule>
Step 7: Enabling Gzip Compression
To make your website load faster, it is recommended that you enable gzip compression. This will greatly reduce the size of the files downloaded from your website. Again, append this to the content of your “.htaccess” file you just created earlier:
<IfModule mod_deflate.c>
   SetOutputFilter DEFLATE
   <IfModule mod_setenvif.c>
      # Old Browsers
      BrowserMatch ^Mozilla/4 gzip-only-text/html
      BrowserMatch ^Mozilla/4\.0[678] no-gzip
      BrowserMatch \bMSI[E] !no-gzip !gzip-only-text/html
   </IfModule>

   <IfModule mod_headers.c>
      # Make sure proxies don't deliver the wrong content
      Header append Vary User-Agent env=!dont-vary
   </IfModule>

   AddOutputFilterByType DEFLATE text/html
   AddOutputFilterByType DEFLATE text/css
   AddOutputFilterByType DEFLATE text/javascript
   AddOutputFilterByType DEFLATE text/xml
   AddOutputFilterByType DEFLATE text/plain
   AddOutputFilterByType DEFLATE image/x-icon
   AddOutputFilterByType DEFLATE image/png
   AddOutputFilterByType DEFLATE image/jpeg
   AddOutputFilterByType DEFLATE image/gif
   AddOutputFilterByType DEFLATE image/svg+xml
   AddOutputFilterByType DEFLATE application/rss+xml
   AddOutputFilterByType DEFLATE application/javascript
   AddOutputFilterByType DEFLATE application/x-javascript
   AddOutputFilterByType DEFLATE application/xml
   AddOutputFilterByType DEFLATE application/xhtml+xml
   AddOutputFilterByType DEFLATE application/x-font
   AddOutputFilterByType DEFLATE application/x-font-truetype
   AddOutputFilterByType DEFLATE application/x-font-ttf
   AddOutputFilterByType DEFLATE application/x-font-otf
   AddOutputFilterByType DEFLATE application/x-font-opentype
   AddOutputFilterByType DEFLATE application/vnd.ms-fontobject
   AddOutputFilterByType DEFLATE font/ttf
   AddOutputFilterByType DEFLATE font/otf
   AddOutputFilterByType DEFLATE font/eot
   AddOutputFilterByType DEFLATE font/woff
   AddOutputFilterByType DEFLATE font/truetype
   AddOutputFilterByType DEFLATE font/opentype
</IfModule>
At this point, this what the content of your subdomain directory should look like:
-rw-rw-r--. 1 myuser myuser 282 Jul 31 16:39 .htaccess
-rw-rw-r--. 1 myuser myuser 249 Jul 31 16:38 robots.txt
lrwxrwxrwx. 1 myuser myuser 34 Jul 31 14:55 wp-admin -> /home/myuser/public_html/wp-admin
lrwxrwxrwx. 1 myuser myuser 36 Jul 31 15:02 wp-content -> /home/myuser/public_html/wp-content
lrwxrwxrwx. 1 myuser myuser 37 Jul 31 17:03 wp-includes -> /home/myuser/public_html/wp-includes
Step 8: Installing and Configuring the WP Super Cache Plugin
The WP Super Cache plugin will not only cache your WordPress content into static files for faster access, but it will allow you to replace the URL to every media files with the URL to your CDN subdomain.
Log in to your WordPress dashboard and go to Plugins > Add New. Search for wp super cache using the keyword search.
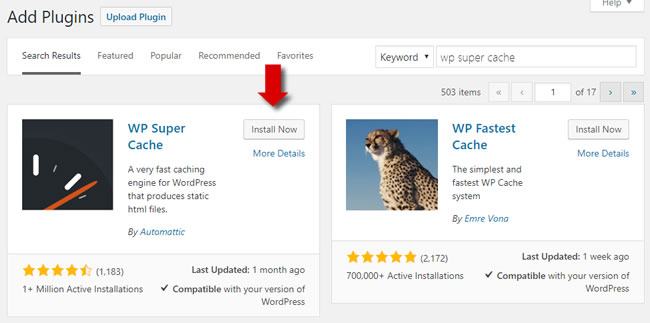
Once the installation is completed, click on the Activate button and then go to Settings > WP Super Cache. I will not go into detail about how to configure WP Super Cache so I recommend that you read this tutorial.
After you’re done configuring the caching settings, click the “CDN” tab and check Enable CDN Support. Enter the URL for your CDN subdomain:
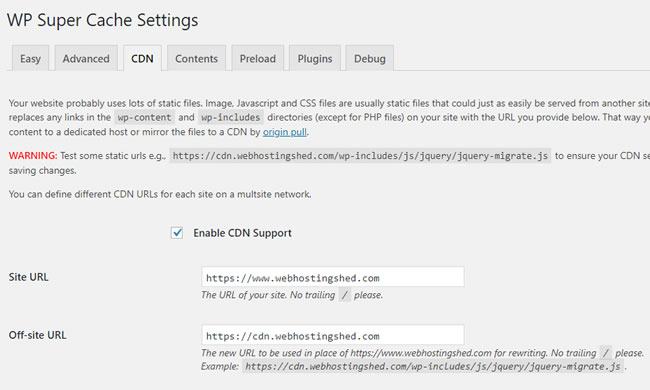
You also need to make that caching is enabled. Click on the “Easy” tab and select “Caching On”.
Step 9: Testing the CDN
One easy way to make sure that the CDN is working properly is to use our web page speed test. Enter your website’s URL and click on “Start Test”. Once the speed test has completed, scroll down to the “Waterfall” section and expand the line for the style.css file:
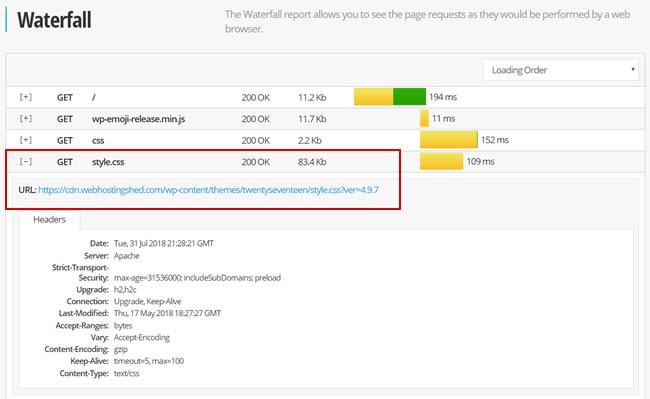
If everything is working as intended, the URL should be pointing to the CDN subdomain and your website should be loading much faster if you’ve also optimized the WP Super Cache settings.
Posted on Updated on by
Source: https://www.webhostinghero.com/blog/wordpress-cdn-on-subdomain/